Sunday, November 30, 2008

Guest Post: Flan, and more

Note from Megan: My brother and I grew up in a family that loves to cook and try out new recipes. Tommy cooks more often than I, and has been quite the entertainer and experimenter lately so I have invited him to be a guest poster and add some additional content and commentary whenever he pleases. This is his first post, but we at la belle patisserie hope he shares his kitchen triumphs with us again!


In my last year of law school I've had several people over for dinner, with the idea that now is the time to live it up, and maybe that these dinners will some day encourage future visits to Dallas by my friends once we all leave C-ville. With these dinners I'm much more of a tinkerer with various protein entrees--fish, poultry, etc.--but in order to provide a complete experience and encourage my friends to help my roommate and I finish off the wine & beer we collect, I have been working with desserts now, too.

Aside from bananas foster (which involves a cheap, low key caramel), this was my first attempt at caramelizing sugar. There were a few technical missteps at the
beginning due to my unfamiliarity with my stove, but the result was just darker caramel, which I think results in a more bitter flavor. Ultimately, the key points I deduced from caramelizing are: (1) only stir the sugar/water suspension until it becomes a solution. Be as precise as possible. (2) Once you get close to the color you want for your caramel, watch very carefully. The solution heats unevenly, and gold turns to brown very quickly. Of course, if you hit brown, this is no problem for flan, as the recipe suggests a slightly bitter caramel is offset by the sweetness of the creme, so all is good.

Everything else about flan is rather simple. Some recipes call for a water bath. I found a recipe that instead just required a longer baking time (2 hours at 225F), which saved me the slight hassle of having to make a water bath with my limited baking supplies. Additionally, the recipe I used called for using a vanilla bean, letting it steep in the milk. I don't cook enough (ever) with vanilla bean, so I wasn't about to shell out 12 bucks for a couple bean pods.1 Instead, I subbed 1tsp vanilla extract for 1 bean. Various internet sources suggested using somewhere between 1tsp and 2tsp, but I decided to go low. Also, low on kosher salt, I subbed in sea salt. Surely this is a no-no for baking purists, but like I said, I'm more about the entrees.

You can find the recipe here.

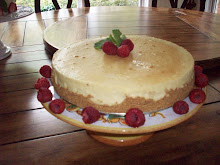
All in all, it turned out to be pretty good. We all enjoyed the food and had some great conversation.


Flan before it was set to cool.


Flan after I'd already taken a couple bites.

The Meal

As for the rest of the meal, we had some bacon wrapped sea scallops, served with rice and toasted almonds and sauteed asparagus. Throughout the meal we enjoyed three varieties of white wine: Gallo Pinot Gris, Nobilo Savignon Blanc, and Martin Codar Albarino (all 2007). All were spectacular. A tip for bacon wrapped scallops - two toothpicks per scallop is better than one--the second pick will help tremendously in both preparation and while cooking. Just don't forget to remove them before you serve them.

Scallops. And glorious bacon.

FN1: While I didn't buy the vanilla beans, I almost did because of the time of year. I recently saw a food network recipe that involved using vanilla beans for mulled wine. After warming sugar and water, they added wine, a few sliced vanilla beans, plus a bouquet garni of cardamom pods (~5), cloves(~5), and two sticks of cinnamon. Mulled wine - why not?

A little tangent


As many you know I have a little obsession with college football and my beloved Texas Longhorns. Today is a sad day for me as 6 computers decided that the root of all evil, Oklahoma Sooners, were a superior team to the Texas Longhorns even though Texas beat OU on a neutral field, 45-35. Seriously?! My heart has broken for the 2nd time this season and my hate (yes, I know it is a strong emotion) for OU has never run deeper. I just needed to get that off my chest.

Saturday, November 29, 2008

Twinkle, Twinkle Little Star...

Here are some of my latest cakes. There are only two because last week we were introduced gum paste flowers and this week was cut short by Thanksgiving. I am disappointed that the pictures of the sea shell cake are a little off. It just doesn't do the cake justice.


Moon & Stars


Seashell Cake


Seashell Cake -- aerial view

Oh, how I miss the beach. Why did I move?

Thursday, November 27, 2008

Cookies + Brownies = YUMMY

Sometimes I struggle to come up with creative blog entry titles. I admit, the above title is rather lame and/or cheesy, but it will have to do. C'est la vie. And now for the actual commentary.

The school semester is quickly coming to an end. Which is good and bad. It's fun to be able to bake and decorate at no cost to me (well except for tuition, but that's just a technicality) and I think my oven issues have been well documented. But I am ready for a break from studying and projects (oh yes, it is not all just fun and games). We have ended fundamentals with cookies and brownies.

In the past two weeks we have made: devil's food cake with chocolate buttercream, jam tarts, nut cookies, Texas Gold cookies, butter cookies, bicotti and brownies. The Texas Gold cookies were definitely one of my favorites and probably a cookie I will make again in the future. I promise that one day I will pass on that recipe. Here is a little looksy at the products.


Devil's Food Cake with Chocolate Buttercream Frosting

The jam tarts are a basic short dough cookie with a raspberry jam filling and then finished with powdered sugar. In my opinion, they are the perfect cookie for a Mr. S. Claus on Christmas eve.


Jam Tarts


Nut Cookies

The Texas Gold cookies were super soft, super chewy and super chocolate-y (and I think everyone knows by now how I heart chocolate). The cookie dough is made with unsweetened & bittersweet chocolate and has semi-sweet chocolate chips....that's three different types of chocolate if you weren't counting.


Texas Gold cookies

The butter cookies were made with a good amount of almond paste so they were more like almond butter cookies. After mixing the dough was placed in a pastry bag and piped onto a sheet pan. Don't they look pretty?


Butter cookie -- make-up

Unfortunately, the dough was too warm before going into the oven and then cookies spread and lost their form. But it didn't affect the flavor.


Butter cookie -- finished product


Biscotti

We had some leftover buttercream from the devil's food cake the week before, so we frosted our brownies with some of the delicious buttercream.


Brownie

Next week is practicals and I will get a second attempt at the almond butter cookies. I also have to bake the lemon buttermilk pound cake from a couple weeks ago. I'll let you know how it turns out. And maybe (if I get my act together) I can send some pound cake to North Carolina and Virgnia.


Happy Thanksgiving


Cooper and Pekoe sharing a meal

Update: a certain orange cat pictured above went to the vet for his yearly checkup. Apparently all his trips to the dog food bowl has caused our little Garfield to put on some pounds and now has to go on a diet.

Saturday, November 22, 2008

The Cheesecake Conclusion

I know everyone has been holding their breath with anticipation waiting to hear how the cheesecake finally turned out after approximately two and one half hours of baking. You will notice this post lacks any photo evidence of baking. The final presentation was not very pretty, but the taste was wonderful. I actually tried something a little different this time for my cheesecake. Instead of 32 oz. of cream cheese I substituted mascarpone cheese for 8 oz. of the cream cheese. The recipe I used has been adapted from Joy of Cooking, a must have for any cook or baker.

Graham Cracker Crumb Crust:

4 tblspn unsalted butter
1 c graham cracker crumbs

Cheesecake Filling:

24 oz cream cheese
8 oz mascarpone cheese
1 1/3 c sugar
4 large eggs
1/4 c heavy cream
1/4 c sour cream
2 tspn vanilla

In a medium bowl, combine butter and graham cracker crumbs. Coat bottom of springform pan evenly.

In a large bowl mix cream cheese and mascarpone. Gradually add sugar. Add eggs, one at a time. Mix in remaining ingredients until incorporated.

Bake @ 325 degrees for 50-60 minutes (or in my case 120-180 minutes...) Cheesecake should be set, but jiggle slightly in center. Turn oven off and let cool in oven for an hour. Let cool completely before removing from pan. Refrigerate overnight.

I prefer to bake my cheesecakes in a water bath. Once the cheesecake filling has been poured into the springform, place the pan onto a sheet of heavy aluminum foil and fold up the sides of the pan. Place in a large roasting pan. Fill roasting pan with boiling water so it reaches halfway up the sides of the springform.

I would love to try this again, but in a more reliable oven. Maybe for a Christmas dessert?

Thursday, November 20, 2008

Love/Hate Relationship

I am a very tired baker right now. And I am currently in the hate phase of my love/hate relationship with my oven.

Now that school is winding down, and two of three projects have been successfully completed and turned in, I have started to focus my energies on recreational baking and trying out new recipes. Tonight I am currently making a vanilla cheesecake which has been in my crappy apartment oven for about two hours. For those of you who don't know, a cheesecake typically takes 55-60 minutes to bake. I am sure a sensible person would ask why I insist on making cheesecakes when I know my oven takes about three times longer to bake them than it should (this is the 2nd cheesecake attempt), but I am headstrong and would scoff at any such person. So instead I am sitting on my couch waiting for a cheesecake that may never finish baking, completely exhausted. And I have an early class tomorrow.

Maybe at a later date I will share some pictures, but I can tell you now it is definitely not a pretty looking cake, but I do believe it will be quite tasty.

Monday, November 17, 2008

Mint Chocolate Chip Deliciousness

It has been a while since I have been able to bake for fun so I decided last weekend I needed to make some cupcakes. If you have been following, the early part of this fall was dedicated to burnt orange cupcakes so it was definitely time to try something new. I had the perfect recipe in mind: Chocolate Chocolate Chip cupcakes with Mint Buttercream frosting.


Mise en Place

The recipes I used I came across on a now defunct cupcake blog, aptly named the Cupcake Bakeshop. I made a couple of changes to try and get the result I wanted.

Devil's Food Chocolate Cake

2 cups flour (I used cake flour so I added 2 tablespoons)
2 cups sugar
1/2 cup unsweetened cocoa powder
1 1/2 teaspoon baking soda
1 1/2 cups milk
1/2 cup butter
2 teaspoons vanilla
2 eggs
1 1/4 cup semi sweet chocolate chips

Mint Buttercream Frosting

1 cup butter
4-5 cups powdered sugar, sifted
1/4 cup milk (I used a small amount of cold water)
1/8 teaspoon all natural peppermint extract

I used the creaming method to mix which is as follows:

Cream butter & Sugar;
Gradually add eggs, mix until combined;
Alternately add sifted dry ingredients with liquid, beginning and ending with dry.
In this case the sifted dry was the baking soda and cake flour and the liquid is the milk. I added the flour in three parts. I also incorporated the cocoa powder and vanilla before the flour. Lastly, I folded in the chocolate chips after the batter was mixed.


Make-up & Panning

I filled the cupcake liners 2/3rds full with the batter and baked @ 350 degrees for about 20 minutes. The cupcakes turned out pretty nicely.


Just out of the oven

I usually let my cupcakes cool in the pan for 5-10 minutes after pulling them out of the oven. I then let the finish cooling on a cooling rack so the bottoms don't get soggy from the steam. I made the cupcakes on Friday evening and waited until Saturday morning to do the frosting. The cupcakes had good flavor, tenderness and moisteness BUT all the chocolate chips sunk to the bottom. Oh, the lessons you learn through your mistakes! Of course I will be trying this recipe again until I get it just right, but I think I will try cutting chocolate chunks instead of chocolate chips.


Finished Product: Mint Chocolate Chip Cupcakes

The flavor combo of Mint Buttercream and Devil's food cake was so delicious! Once I work out the kinks with the chocolate chips/chunks* it will be a most excellent cupcake!


*Someone gave me a tip that if I coat the chocolate chips in flour they won't sink. I asked on of the baking instructors and he said that may not work because chocolate chips have a waxy coating and are heavy. It was suggested I try the chocolate chunks.

Sunday, November 16, 2008

Fun with Fondant

YAY! It's finally here! FONDANT!

So we started working with fondant. I don't really have much commentary so I will just share some cakes. I have included some other cakes from class because I thought they were so pretty.


Front view


Side view


Back view


Alecia's Leaf Cake


Whitney Sprinkle's Flower Cake

Thursday was our first practical for cake decorating II. For several weeks now I have been dying to make a Hungry, Hungry Hippo cake. Originally I was going to do it two weeks ago, but that was the week I was sick. I decided it would be the perfect cake for my midterm. Creative, fun, and requiring multiple techniques. I used buttercream icing, but I kinda wish I had waited and made it with fondant. I guess it's cute enough, but it could have been better.


Hungry, Hungry Hippo

P.S.: My first attempt at a poll has garnered little attention and even fewer votes. It's making me sad...

Foam Cakes

We have moved on to cakes and cookies in fundamentals, which is both good & bad. Good because cakes and cookies are so yummy; bad because cakes and cookies are so yummy...and I have a rather large sweet tooth.

We started with Angel food and Chiffon cakes. Both cakes have a large amount of egg whites which help the cakes rise. Angel food cake reminds me of my childhood - It seems like every week my parents would be an Angel food cake from Tom Thumb. Normally, I would rave about my bakeshop creations, but truthfully, I still love that Tom Thumb Angel food cake from my childhood so much more! I think it needed some more vanilla. On the other hand, the Chiffon cake was great!


Angel Food Cake


Chiffon Cake

We also baked a lemon buttermilk cake last week which was so delicious! This is a cake I will definitely make again. I think I would like to try it as a layer cake with strawberry filling.


Lemon Buttermilk Cake

We ended Tuesday's class period with a traditional favorite: Chocolate Chip cookies. The dough was too warm when we put them in the oven so our cookies spread quite a bit (which according to the instructor is bad. And makes ugly cookies.) But according to those who consumed the "ugly" cookies they were the best cookies ever! (Just fyi: I am not the only one who consumed the cookies. I brought them to work where everyone went crazy for them.) The cookie recipe was just your basic, back of the Tollhouse bag so nothing too special there.


Chocolate Chip Cookies

On deck: Devil's Food Cake

Thursday, November 13, 2008

Did you notice that poll on the right hand side????

You did? Well then why haven't you voted? It will make me feel special.

Tuesday, November 11, 2008

How Can I Be a Better Blogger?

1. It would probably help if I stayed up-to-date with the blogging...So in my quest to be a better blogger, I will give a little cake decorating update.

Last week we did doll cakes (which are a little creepy to me) and petits fours (which are pretty much the biggest pain in the ass ever.) The fun part about the [creepy] doll cakes was deciding what to make - after all I wasn't just going to do the run-of-the-mill, plain jane barbie-looking cake. Instead I decided to decorate mine like a Disney Princess (I know, so much more original). I chose Snow White, in part because I was inspired by a friend's Halloween costume. I decided to dye the doll's auburn colored hair black (which was truly a terrible idea) to achieve the full effect.


Snow White

I wasn't crazy about the outcome, but I think it was pretty cute. My friend Dani (she's been wanting some blog love) made a Wonder Woman cake which was truly adorable and original, but boxed it up before I could take a picture.

Thursday was petits fours day. For those of you who might be wondering why petits fours are somewhat pricey, I have an answer: they are messy, time consuming, and NOT fun. Never again, my friends, never again. Plus, the icing is so ridiculously sweet it made me almost sick just eating one. By the time I was done icing the darned things I didn't even want to decorate so they are kind of boring looking.


2. One of the things I love about blogging is the inspiration it provides. I have actually come across some really great & creative blogs* searching for a recipe idea. I also have a dear friend who is somewhat of a blogger savant. I don't know how she finds them, but she has turned me on to some of my favorite blogs. I was thinking about how much I can take away from other people's daily musings, I hope I can provide the same to people who might come across my little internet home. With that in mind, I was thinking I should share a little more of the techniques I learn on a daily basis and some of the recipes we use in class. I think I will start a poll to see what my readers would like to see in the future.

So please, tell me, how can I be a better blogger?

*Sometimes I worry my cakes will end up on Cake Wrecks...please don't submit them.

Tuesday, November 4, 2008

Pies & Tarts

"Baby don't you cry, gonna make a pie, gonna make a pie with a heart in the middle. Baby don't be blue, gonna make for you, gonna make a pie with a heart in the middle. Gonna make a pie from heaven above, gonna be filled with strawberry love. Baby don't you cry, gonna make a pie, and hold you forever in the middle of my heart."

--Waitress

The last couple weeks have been focused on pies (and a couple tarts) in my Fundamentals class. I have never really considered myself a 'pie' person. I have a wicked sweet tooth, but I prefer cakes and cookies over pies. But after this class I have learned that pies can be just as divine and yummy as cakes and cookies! And homemade pie dough makes all the difference in the world - the flakiness and the flavor really adds to the pie. Here is a rundown of what we have baked:
  • Chocolate Cream Pie
  • Key Lime Pie
  • Old-Fashioned* Apple Pie
  • Peach Sour Cream Pie
  • Cherry Pie
  • Pumpkin Pie
  • Pecan Pie
  • Lemon Meringue Pie
  • Walnut Tart
  • Fruit Tart & Tartlets
We also did cream puffs and eclairs with the pastry cream we made for the Fruit Tart. I don't have pictures of everything, but here's some of our group's beautiful pies (and tarts. and eclairs & cream puffs.).


Cherry


Pumpkin


Pecan


Lemon Meringue


Walnut Tart


Eclairs & Cream Puffs


Fruit Tartlets


Fruit Tart #1**


Fruit Tart #2**

*Old-Fashioned is actually the method used to prepare the pie.

** Our group made two fruit tarts. I did the fruit design on the first tart, and another member of our group, Nicole, did the design on the second tart. We used plums, strawberries, kiwis and mandarin oranges.